This guide walks you through the steps for using CorpusDB Merge.
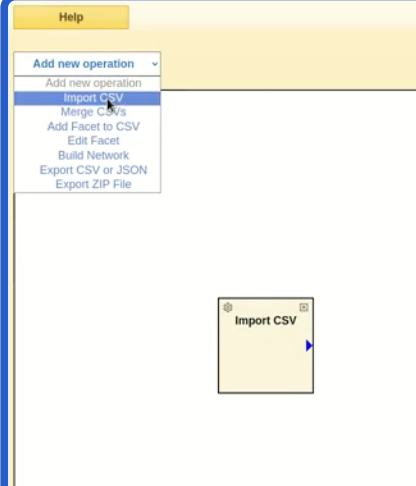
Step 1: Add Import Image Filter
Insert the Import Image Filter into your workspace.
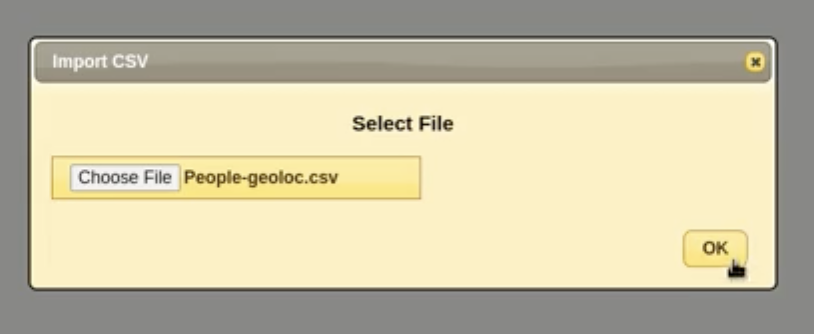
Step 2: Select Input File
Select the input file you want to use.
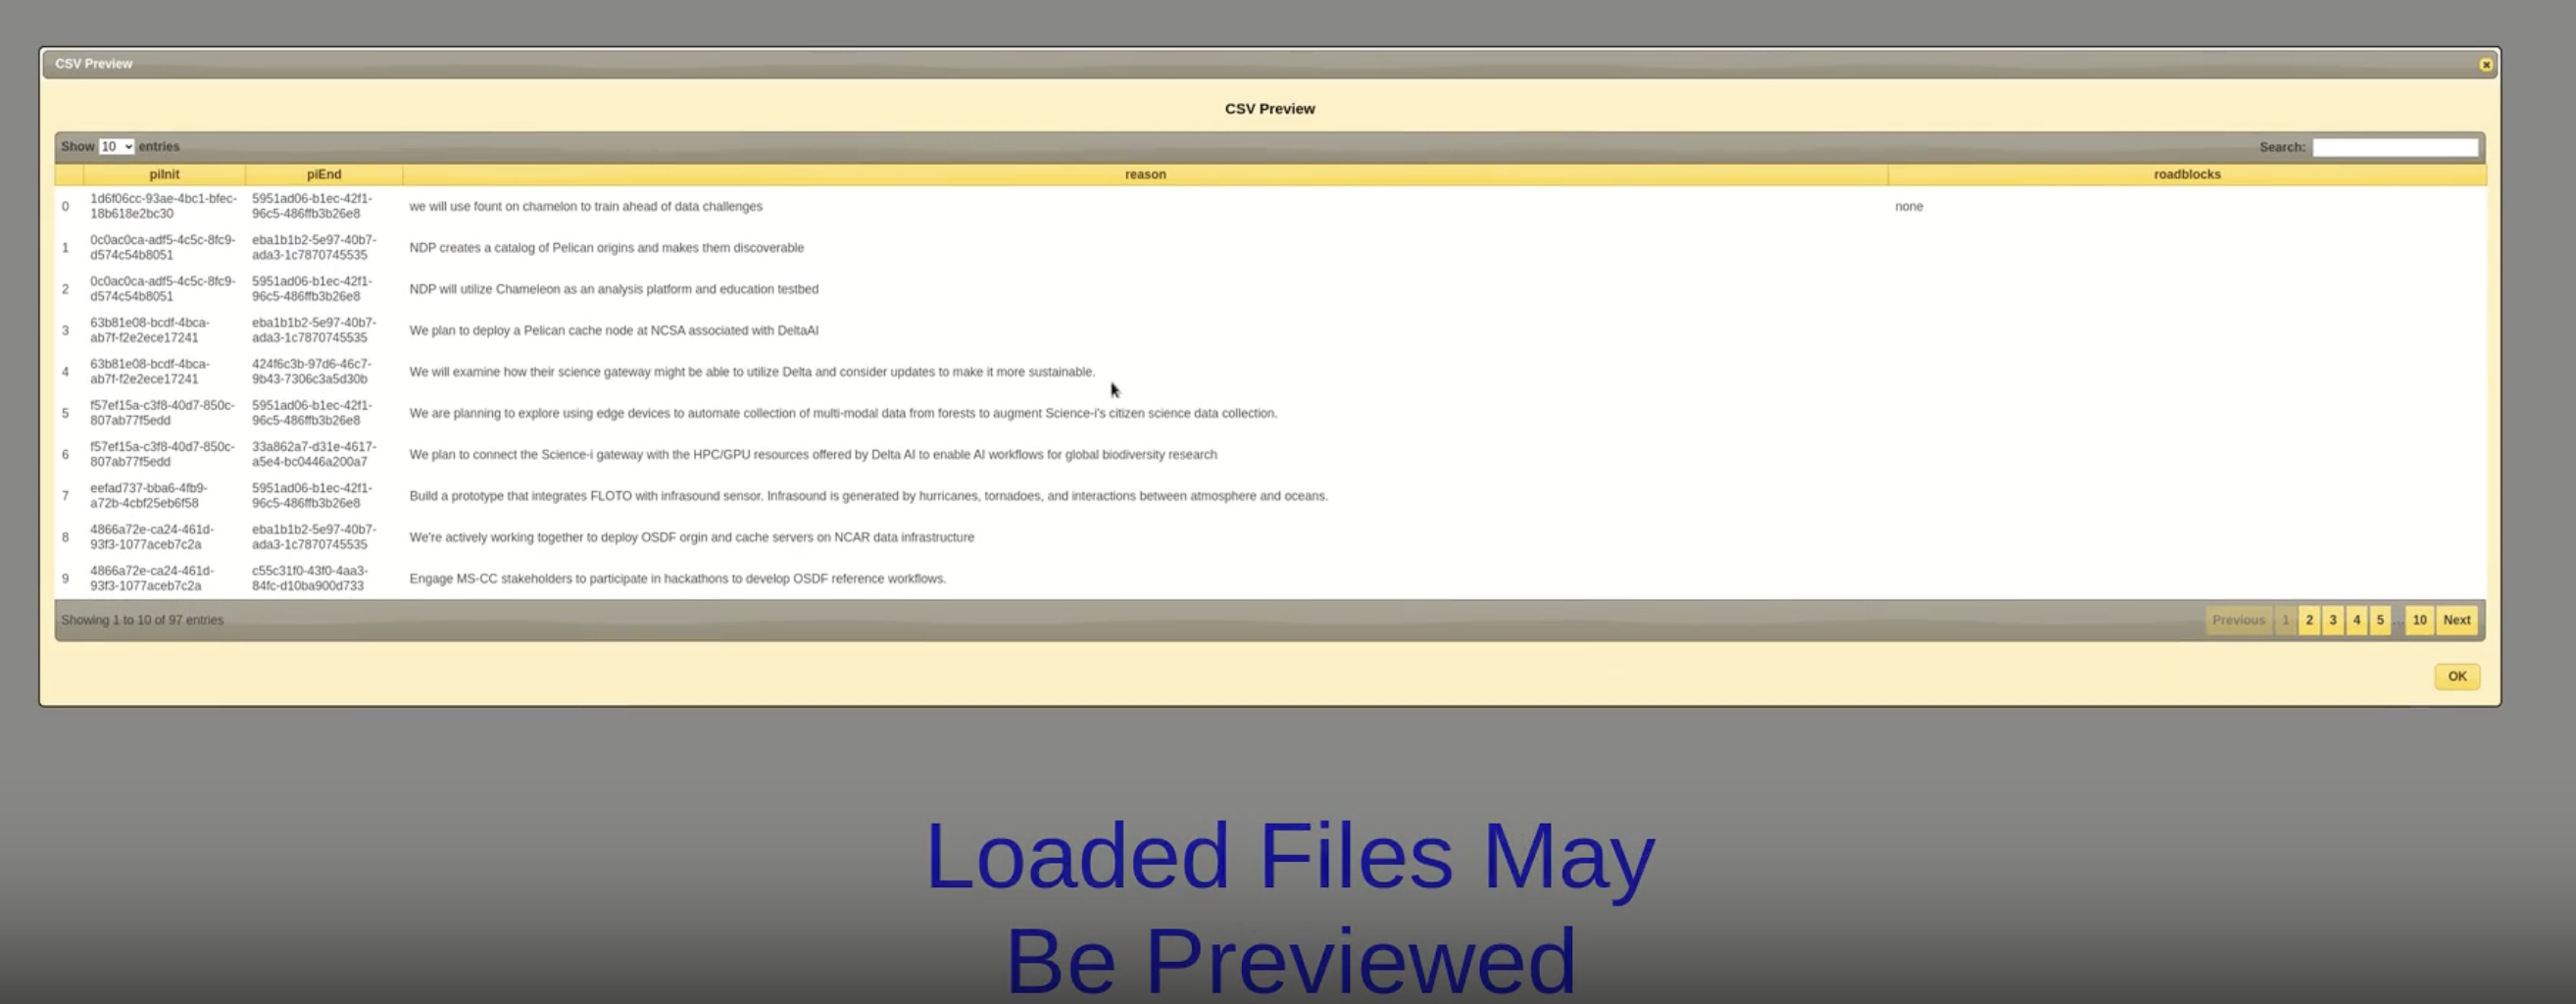
Preview Loaded Files
Loaded files may be previewed before proceeding:
Edit or Delete Facets
Facets may be edited or deleted as needed:
Step 2: Select Input File
Select the input file you want to use.
Example: Importing Multiple CSV Files
You can import more than one CSV file into CorpusDB Merge.
For example:
- Collaborations.csv – containing collaboration data between principal investigators.
- People-geoloc.csv – containing geolocation and affiliation information for people.
Preview of People-geoloc.csv
awardId,firstName,lastName,email,middleInitial,affiliation,address,city,countryCode,stateCode,zipCode,latitude,longitude,location,affiliateType,personId
2331480,Brian,Bockelman,bbockelman@morgridge.org,P,THE MORGRIDGE INSTITUTE FOR RESEARCH, INC.,330 N ORCHARD ST,MADISON,US,WI,537151119,43.0728101,-89.4080519718417,"330 N ORCHARD ST, MADISON, WI, 537151119",PI,eba1b1b2-5e97-40b7-ada3-1c7870745535
2333609,Ilkay,Altintas,altintas@sdsc.edu,,UNIVERSITY OF CALIFORNIA, SAN DIEGO,9500 GILMAN DR,LA JOLLA,US,CA,920930021,32.87924375,-117.231124683773,"9500 GILMAN DR, LA JOLLA, CA, 920930021",PI,0c0ac0ca-adf5-4c5c-8fc9-d574c54b8051
2331263,Peter,Beckman,peter.beckman@northwestern.edu,H,NORTHWESTERN UNIVERSITY,633 CLARK ST,EVANSTON,US,IL,602080001,42.0557157,-87.6752945473942,"633 CLARK ST, EVANSTON, IL, 602080001",PI,72637c9f-1768-4d0b-816e-331356f974a6
Preview of Collaborations.csv
piInit,piEnd,reason,roadblocks
1d6f06cc-93ae-4bc1-bfec-18b618e2bc30,5951ad06-b1ec-42f1-96c5-486ffb3b26e8,"we will use fount on chamelon to train ahead of data challenges",none
0c0ac0ca-adf5-4c5c-8fc9-d574c54b8051,eba1b1b2-5e97-40b7-ada3-1c7870745535,"NDP creates a catalog of Pelican origins and makes them discoverable",
0c0ac0ca-adf5-4c5c-8fc9-d574c54b8051,5951ad06-b1ec-42f1-96c5-486ffb3b26e8,"NDP will utilize Chameleon as an analysis platform and education testbed"
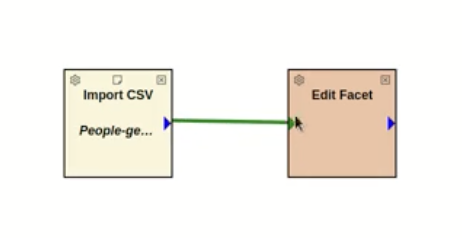
Step 3: Connect Tabs
Connect by clicking the tab, dragging, and clicking the connecting tab.
Step 4: Add a New Facet
Add a new facet to your workspace.
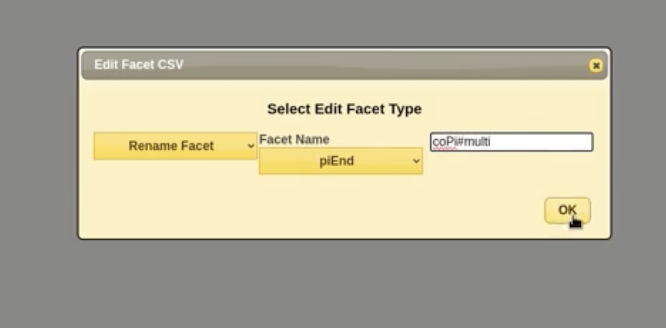
Rename Facet to Prepare for Merge
Rename the facet to prepare it for merging.
![Rename Facet]
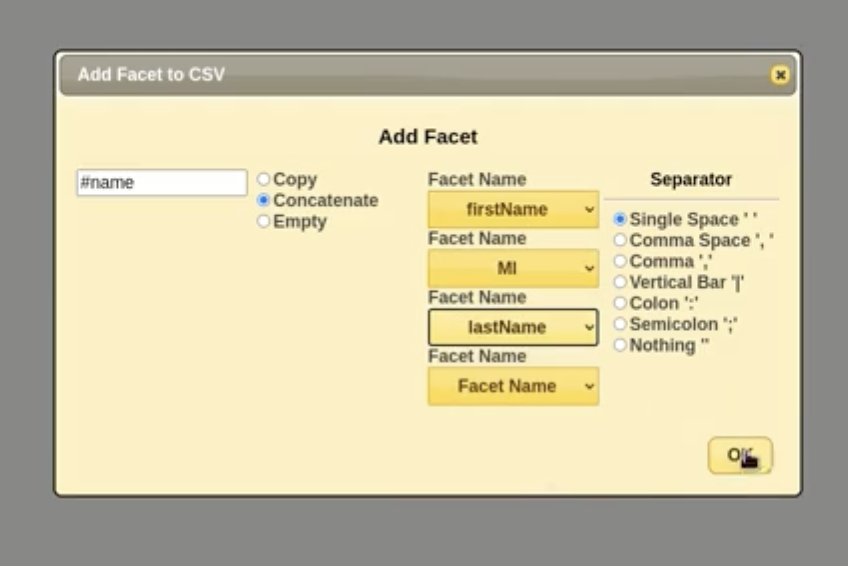
Example: Adding Facets to People-geoloc.csv
In this example, after importing People-geoloc.csv, we add:
- A new facet called
#nameto combinefirstName,MI,lastName. - An empty facet called
coPi#multito hold potential co-principal investigator values.
Updated table preview:
awardId,firstName,lastName,#name,email,middleInitial,affiliation,address,city,countryCode,stateCode,zipCode,latitude,longitude,location,affiliateType,personId,coPi#multi
2331480,Brian,Bockelman,Brian Bockelman,bbockelman@morgridge.org,P,THE MORGRIDGE INSTITUTE FOR RESEARCH, INC.,330 N ORCHARD ST,MADISON,US,WI,537151119,43.0728101,-89.4080519718417,"330 N ORCHARD ST, MADISON, WI, 537151119",PI,eba1b1b2-5e97-40b7-ada3-1c7870745535,
2333609,Ilkay,Altintas,Ilkay Altintas,altintas@sdsc.edu,,UNIVERSITY OF CALIFORNIA, SAN DIEGO,9500 GILMAN DR,LA JOLLA,US,CA,920930021,32.87924375,-117.231124683773,"9500 GILMAN DR, LA JOLLA, CA, 920930021",PI,0c0ac0ca-adf5-4c5c-8fc9-d574c54b8051,
2331263,Peter,Beckman,Peter Beckman,peter.beckman@northwestern.edu,H,NORTHWESTERN UNIVERSITY,633 CLARK ST,EVANSTON,US,IL,602080001,42.0557157,-87.6752945473942,"633 CLARK ST, EVANSTON, IL, 602080001",PI,72637c9f-1768-4d0b-816e-331356f974a6,
For Collaborations.csv
After importing Collaborations.csv, we make the following changes:
- Remove the empty facet ``.
- Rename the
piEndcolumn tocoPi#multi.
Updated table preview:
piInit,coPi#multi,reason
1d6f06cc-93ae-4bc1-bfec-18b618e2bc30,5951ad06-b1ec-42f1-96c5-486ffb3b26e8,"we will use fount on chamelon to train ahead of data challenges"
0c0ac0ca-adf5-4c5c-8fc9-d574c54b8051,eba1b1b2-5e97-40b7-ada3-1c7870745535,"NDP creates a catalog of Pelican origins and makes them discoverable"
0c0ac0ca-adf5-4c5c-8fc9-d574c54b8051,5951ad06-b1ec-42f1-96c5-486ffb3b26e8,"NDP will utilize Chameleon as an analysis platform and education testbed"
Step 5 : Choose Merge Selector Facets
Choose the facets you want to merge.
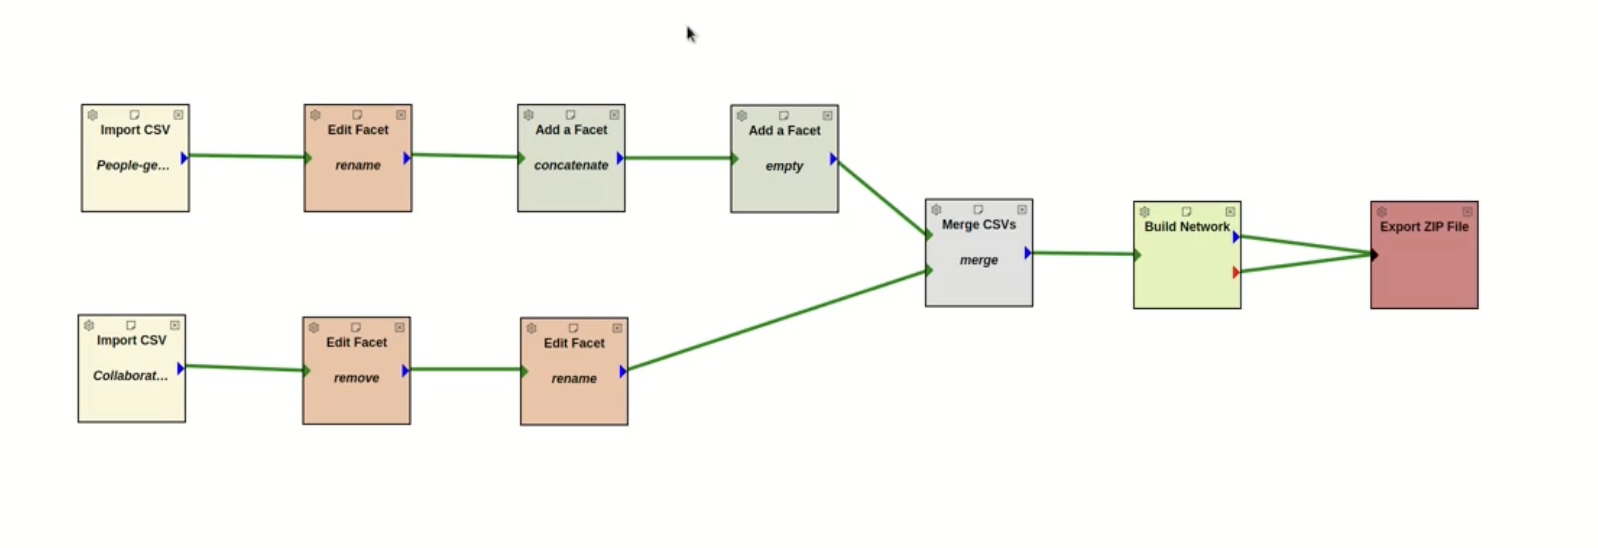
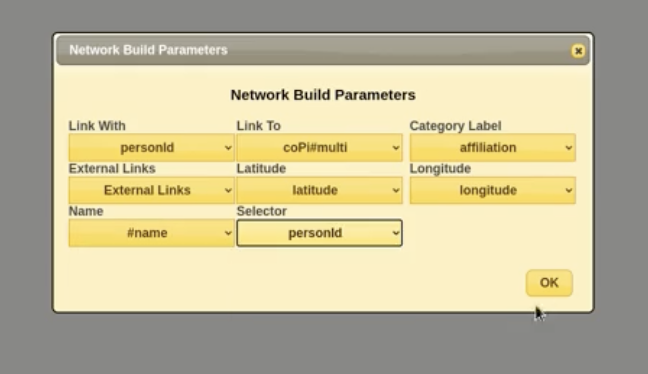
Step 6: Build the Network
Build the network based on your selected facets.
 —
—
(Result Preview): Merged Output
After the merge and facet edits, the combined dataset looks like this (first few rows):
awardId,firstName,lastName,email,MI,affiliation,address,city,countryCode,stateCode,zipCode,latitude,longitude,location,affiliateType,personId,#name,coPi#multi,piInit,reason,roadblocks,#netvis
2331480,Brian,Bockelman,bbockelman@morgridge.org,P,THE MORGRIDGE INSTITUTE FOR RESEARCH, INC.,330 N ORCHARD ST,MADISON,US,WI,537151119,43.0728101,-89.4080519718417,"330 N ORCHARD ST, MADISON, WI, 537151119",PI,eba1b1b2-5e97-40b7-ada3-1c7870745535,"Brian P Bockelman","c55c31f0-43f0-4aa3-84fc-d10ba900d733|72637c9f-1768-4d0b-816e-331356f974a6|4ecea92d-829e-4fde-ba37-f4cb4b6034ef|33a862a7-d31e-4617-a5e4-bc0446a200a7|1749ec3e-f468-4c2b-9625-9daf05a0c386|03ffe97f-1724-43ce-9691-02a5748f578e|7bbc3b47-00c8-45d7-acef-6e6e40e5ecb6|920962ff-c4a3-4b2d-b870-6ecb198e49da|e91ea88a-205f-44bc-9ea1-2c5acc6f9b66|424f6c3b-97d6-46c7-9b43-7306c3a5d30b|2c3da791-2057-4fe3-8f1b-4e5ccc5d980d|0c0ac0ca-adf5-4c5c-8fc9-d574c54b8051|1eeeb7a1-2660-41de-8867-6ce18559097d|91b514fa-376e-4211-83df-de1b1c1ddf99|10694561-56c2-411b-b8b1-ae8ec8c4b5af",eba1b1b2-5e97-40b7-ada3-1c7870745535,"Ensuring common CESM input data are available via the OSDF via the NCAR integration; updating CESM wrappers to download common data by invoking the Pelican client; demonstrating end-to-end runs on NDC-C funded hardware resources (such as Stampede3 or DeltaAI).","Ensuring there is caching hardware available for international collaborators in the modeling community (e.g., South Africa)",c3abc445-a708-435c-9037-ee2170328ea8
2333609,Ilkay,Altintas,altintas@sdsc.edu,,UNIVERSITY OF CALIFORNIA, SAN DIEGO,9500 GILMAN DR,LA JOLLA,US,CA,920930021,32.87924375,-117.231124683773,"9500 GILMAN DR, LA JOLLA, CA, 920930021",PI,0c0ac0ca-adf5-4c5c-8fc9-d574c54b8051,"Ilkay Altintas","eba1b1b2-5e97-40b7-ada3-1c7870745535|5951ad06-b1ec-42f1-96c5-486ffb3b26e8",0c0ac0ca-adf5-4c5c-8fc9-d574c54b8051,"NDP will utilize Chameleon as an analysis platform and education testbed",,2d07c3ae-5bad-4fe9-91c5-5ea29cb1fd42
2331263,Peter,Beckman,peter.beckman@northwestern.edu,H,NORTHWESTERN UNIVERSITY,633 CLARK ST,EVANSTON,US,IL,602080001,42.0557157,-87.6752945473942,"633 CLARK ST, EVANSTON, IL, 602080001",PI,72637c9f-1768-4d0b-816e-331356f974a6,"Peter H Beckman"
Step 7: Save Network in ZIP File
Save the completed network in a .zip file for future use.
Note: For more details, click the Help button on the CorpusDB Merge tool page. There, you will find a video tutorial and a detailed documentation with examples.
Step 8: Upload the ZIP to SuAVE and View the Network
Upload the .zip you just exported into SuAVE and open the NetVis view.
A. Create a New SuAVE Survey from the ZIP
- Open SuAVE and click New Survey
- Choose Upload CorpusDB ZIP File and select your exported file (e.g.,
project.zip). - Name the new survey.
- Click Submit to build the survey.
B. Select the NetVis Network
- In the Network (NetVis) view, open the gear/settings (⚙️) for the network panel.
C. Example: Resulting Network
Below is an example of what the uploaded network looks like in SuAVE:
